3 Steps to Creating a Scoping Document for Your Mobile App

Starting development on your first no code mobile app app can feel daunting and overwhelming. “Where do I start?”, “What prep work do I need to do?”, and many more questions can make it feel insurmountable. But our motto at Thunkable is everyone has great ideas, and together we can help you make them a reality. With every project and client, we guide through this process — we create a scoping document. A well-scoped requirements document will give you a north star for your entire app development effort.
We’ve outlined 3 steps to scoping out what you will need to make your mobile app yourself or hand off to your development team or a freelancer.
Check-In

Before moving onto the 3 steps for scoping success — make sure you have a clear project vision and story for your app. Audiences attach themselves to stories so, what is the story you are creating with your app? What problem are you looking to solve?
Step 1: Feature! Feature! Feature!
An app comes to life with features, actions, and abilities. The user experience and journey through your app can make or break the success of any digital interface. But fear not! There are a few ways to break this down:
Visualize Your User Journey
Define the purpose of your no code mobile app. Document the problems your app will solve for your users and list out the steps needed to help them come to a solution. Clarify the features you want to have to enhance your user’s journey between screens.
Core Functionality of Your No Code Mobile App
After you understand the journey your users will take via your app roadmap, now is time to understand what basic features and core functionality you need to make your app work. Here’s an example to get you started:
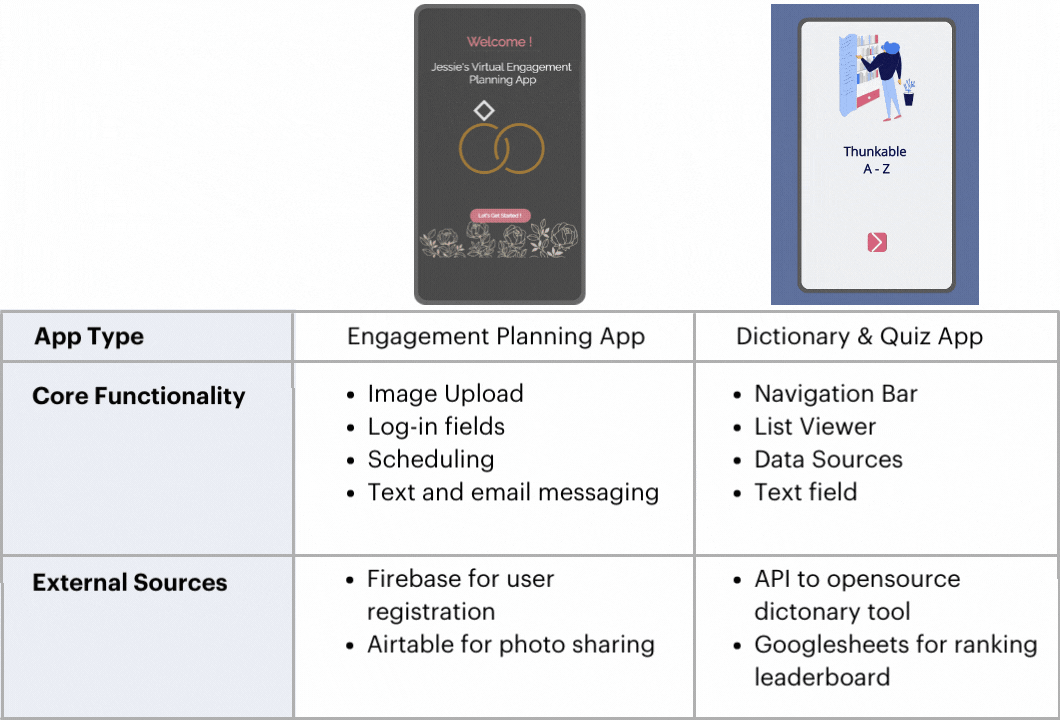
These are just a couple of examples from our very own Thunkers but other things to consider are In-App-Payments, AdMob integration, Figma import, push notifications, etc.
Yes, Down to the Core!
It’s easy to get lost in all the fantastic features you want to integrate into your app, but it’s essential to stick to the critical elements. Why? Let’s introduce the MVP concept. MVP stands for “minimum viable product,” which is the version of a product or, in this case, an app with enough features that can be offered to users so that it is fully functional but can be used to observe and collect feedback improve that product or app.
Why is this important? First off, the best guidance you will receive for your app will come from the users themselves. We can always do our best to anticipate the needs of our users and hope we supply the features our users will love most, but you will only know once they start using the product. The first iteration of your app will not be your last, so it is critical to release an app with core functionality to attract early adopters and get real-world feedback.
Some things to consider when getting down to the core of what is essential and what is not:
- Will this feature drive user adoption?
- What is the level of effort required to build this element?
- Will users use be able to successfully complete their task in the app if this feature isn’t included?
- Does this feature enhance the experience of early adopters, or will it only be needed once you have many users?
Reminder: just because all these features should be added to your no code mobile app, doesn’t mean you have to do it all at once. You can always include them in a later release, but at least by then, you will know if this is something to invest in based on real user feedback. Your first iteration will be your best first opportunity at attracting early adopters to build interest. If you would like to tap into a very engaged and responsive community to begin the process of early adopters, share your published app with the Thunkable community.
Step 2: Design — Tying it all together
Now is time for the fun part, visuals! If you love getting creative, then this would be the part where you can get into your element. If not, no worries, we can guide you through this process.
After determining your core requirements, this design portion will tie it all together, a perfect sync between functionality and visual appeal. To help guide, you stick to these three principles of design: simplicity, consistency, and adaptability.
Simplicity
Keep your design simple. No need to overcomplicate and clutter your no code mobile app with too much. Think about the apps you enjoy using not just for their content but to analyze their designs. Successful designs are those that are simple yet effective in communicating their purpose. Looking to trending app designs as inspiration can help guide you as well. This also applies to the copy you will display on your screens. For example, you wouldn’t use a button with text reading “Home”; instead, you would simplify this and utilize a visual depiction of a home icon.
Consistency
Give the eyes a feast! Having a brand guideline would help give your app a consistent look and feel. Such elements include a logo, color palette, and typography, to name a few. Having a guideline as a reference can help you maintain the consistency of your brand image. This way, you will know what colors to use for your background or buttons rather than deciding as you are building it only to realize the colors you used on one screen are different from the next.
Adaptability
This one might be a little hard to predict since you haven’t yet built your n code mobile app, but it’s an excellent tip to keep in mind. Your app will go through many iterations and updates. Get comfortable with the idea of changes and prioritize fast changes rather than deeper design decisions.
We’ve summed up a few principles we like to stick to, but there are many more aspects of UX design to explore.
Step 3: Implementation
We’re almost there! Now is the time to get into the nitty-gritty of logistics. What do you need to put this all into action? Let’s review what you’ve accomplished thus far:
- App Story
- User Journey
- Core Features
- Design Elements
With all these parts, and you have successfully scoped out all the requirements needed from your app. You can either hand it off to your development team with a clear vision and essential requirements needed or if you are building this yourself, let’s keep going!
Get Familiar With Your No Code Platform
Now that you have your vision and path, it’s time to get familiar with your tools. Thunkable is the most powerful no code mobile app development platform to design, develop, and deploy native Android, iOS, and mobile web apps with native capabilities and complete customization. With Thunkable you can utilize our great resources:
- Thunkable Docs: Utilize Thunkable Docs to learn how to get started, access our tutorials, understand the available features and capabilities, and more!
- Video Tutorials: We have a variety of videos on our YouTube to address any of your questions and walk you through any questions you may have.
- Support: Thunkable offers varying levels of support to get you all the help you need. Our Creator Success team will be an extension of your team to get you on track and across the finish line.
- Thunkable Community: Unique to this platform, you have access to an international and engaged community. Why is this helpful to you? Finding early adopters is a struggle, but by tapping into this community, you can get quick feedback and engagement to improve your app.
Testing and Publishing
Plan for a testing strategy before publishing. Thunkable allows for live testing so you can QA and preview your no code mobile app before publishing. Ensure the app behaves how you want it to and troubleshoot anything that doesn’t work as expected.
Once you are ready to publish you can follow these guides depending on whether you publish to the App Store or Play Store.
Lift Off!
You now have the pathway to building, designing, and launching your app, congrats! There are many steps and ways to get your first mobile app off the ground, and this is just one of many methods. At Thunkable we tailor and adjust project scopes based on client needs and timelines. Whether you want to create your first startup business, build a side hustle, or need a no code mobile app to extend your business, we are here to help!
Check out our solutions for:

Related Resources
.png)
Ensuring Proper Quality Assurance Testing Before Publishing Your Mobile App
.png)
What's New with Thunkable? March 2024 Product Updates
.png)
Now Available: Thunkable Partners with Fiverr to Launch the Certified Experts Marketplace!
What Will You Create?
Ready to take your first steps towards developing that amazing idea? Get started on your app for free.
